This page describes the mechanics of exploration in Elite: Dangerous, as they work since version 3.3 (December 2018).
The goal is to give a global view on chaining of the different steps and describe the functioning of the different interfaces.
The Deepening exploration section goes into details for some parts.
The exploration process
The exploration tools allow to discover the stellar bodies and points of interest in the systems. Each stellar body can have several levels of discovery:
- Undiscovered: No information on the position or nature of the stellar body: it is unknown.
- Detected: Spectral signature available indiscriminately in the spectrum of the system. Ability to use this signature to locate the stellar body, know its global type and analyze it.
- Discovered: The position of the stellar body is known, as well as its general data (type, gravity, composition,…).
- Mapped: The surface of the stellar body has been mapped (with probes), the surface points of interest are known and located on the surface.
Basically all the stellar body have undiscovered status unless a commander:
- Discovered them (Level 3.).
- And sold its data to a station at Universal Cartographics.
Some systems are fully discovered by default (Sol, Achenar, Alioth, populated or important systems).
Beyond localization and information on the bodies, the level of discovery increases the revenue when selling the data to Universal Cartographics:
- The Detected level reports a fairly low value, ranging from 500 cr for the rocky planets to about 85 000 CR for the Terraformable water worlds.
- The Discovered level reports an amount equal to 3 times the amount of the Detected level (except rocky planets and ice remaining at the base value), i.e. about 260 000 Cr for the Terraformable water worlds.
- The Mapped level reports 4 or 5 times (depending on the efficiency, see section bout the Detailed Surface Scanner) of the amount of the Discovered level, i.e. about 1 to 1.3 million Cr for the Terraformable water worlds.
The exact value of each body depends on its radius and many other characteristics, which modify slightly the amounts.
The value of the Detected level for all the stellar bodies of a system is carried by the main star (in addition to its own value) when the data is sold.
In addition, once the data is sold (the time of selling is used to determine who is the first):
- The first commander to Discover a stellar body, adds his CMDR name in tag “First discovery“.
- The first commander to Map a stellar body, adds his CMDR name in the tag “First cartography“.
Each of these two tags confers a bonus of 60%, cumulative credits.
The discovery of 100% of the system’s stellar bodies also gives a credit bonus.
Two different modules allow to discover the stellar body:
- The Discovery Scanner (FSS) allows:
- By a simple scan to pass all the stellar bodies of the system from the Undiscovered level to the Detected level.
- Then through a visual analysis using its dedicated interface, to move the targeted bodies from the Detected level to the Discovered level.
- These operations can be done from anywhere in the system, but in super-cruise only and at Throttle to zero.
- The Detailed Surface Scanner (DSS):
- Using an Third-person view, you can send probes to move a body from the Discovered level to the Mapped level.
- To achieve this cartography, we must approach very close to the planet, while remaining in super-cruise (possible in slow motion).
The Discovery Scanner is equipped on all ships (no slot required). The Detailed Surface Scanner, on the other hand, is an optional size 1 module which must be equipped on board in order to use it. To make them work, you also have to pass your HUD in Analysis mode.
The diagram below shows the sequence of the various interfaces used in exploration:
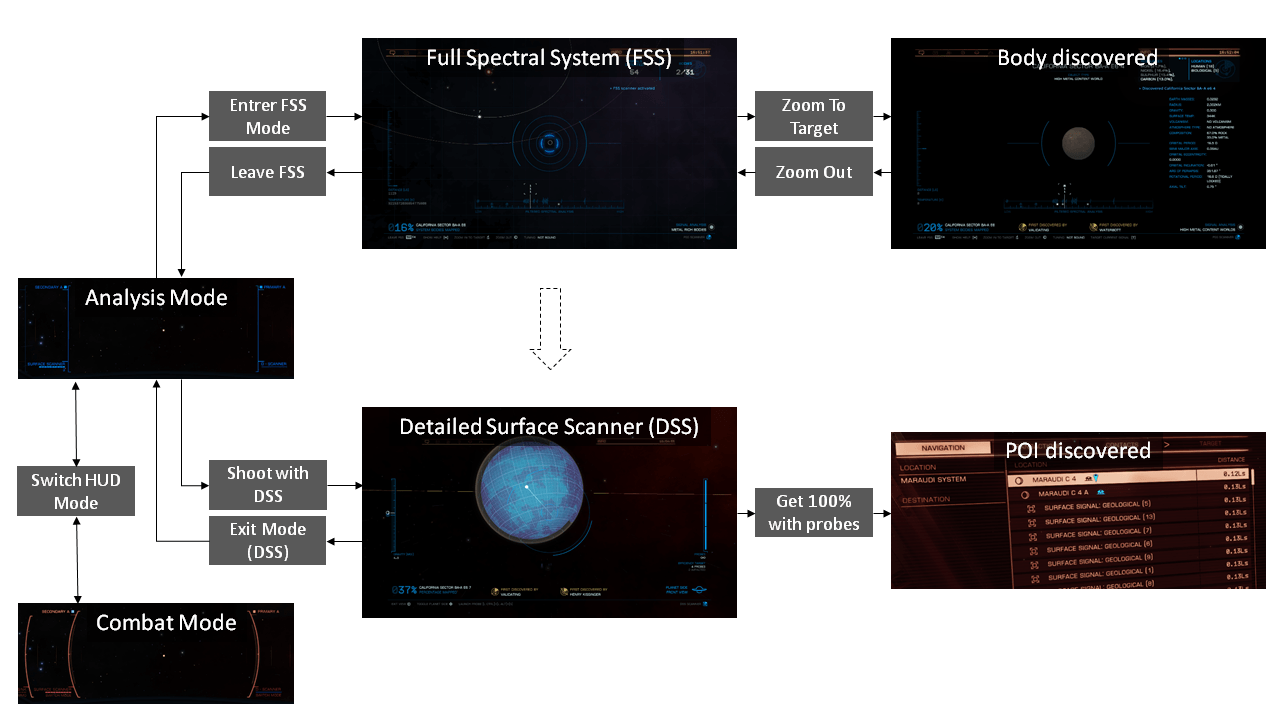
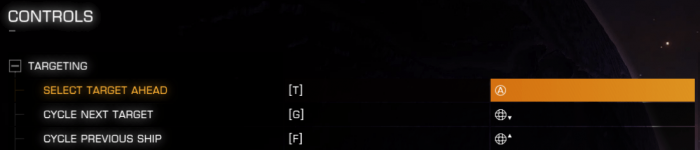
The grey boxes correspond to the different commands, each having its Binding (keys or buttons to be set in the section Options/controls of the menu Main).
A dedicated page details all the necessary bindings in exploration:
The Analysis Mode
Since version 3.3, there are two modes for the ship’s HUD:
- The Combat Mode, by default, that allows to use the weapons, but not the exploration or mining Tools.
- The Analysis Mode, accessible via the Switch HUD Mode command, where weapons are not usable, but allowing the use of exploration or mining tools.
In order to be able to use the Discovery Scanner and the Detailed Surface Scanner, it is imperative to be in Analysis mode.

If you try to use the exploration modules in Combat mode, you get the following error message:

The Discovery Scanner (FSS)
The Discovery Scanner is made up of two elements:
- A scanner, allowing to obtain the energy signature of a system (“Honk”). This scanner is an internal module that activates by maintaining it for a few seconds:
- Via a fire group (assign the Discovery Scanner module to the main or secondary fire).
- Via the Dedicated Discovery Scanner Interface (Discovery Scan command).
- A dedicated interface allowing, with the help of the energy signature of the system, to explore it in detail.
Once the energy scan (“Honk”) has been completed, information on the number of bodies present in the system is displayed in the top right of the HUD (info panel):

Discovery Scanner Interface
In order to open the dedicated interface it is necessary:
- To be in Analysis Mode.
- To be in Super-cruise.
- To have the ship’s thrusters at zero (even if the ship is not yet stationary).
- These three conditions combined, use the Enter FSS Mode command.
If the scanner has not been used (“Honk”), the interface appears as follows :
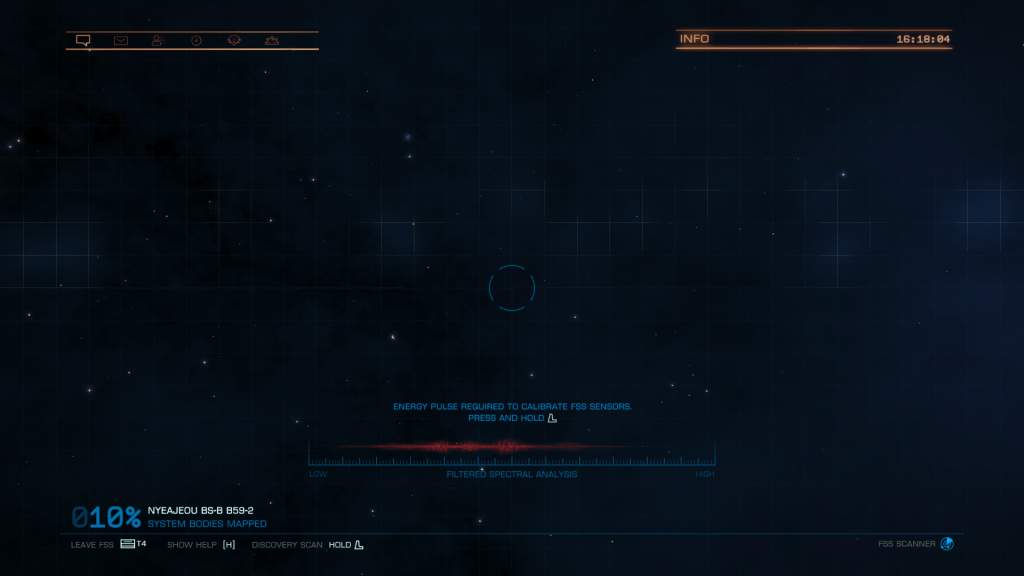
It is possible to perform the energy scan (“Honk”) directly from the Discovery Scanner Interface (Discovery Scan command).
Once the scan is completed, the interface appears as follows:
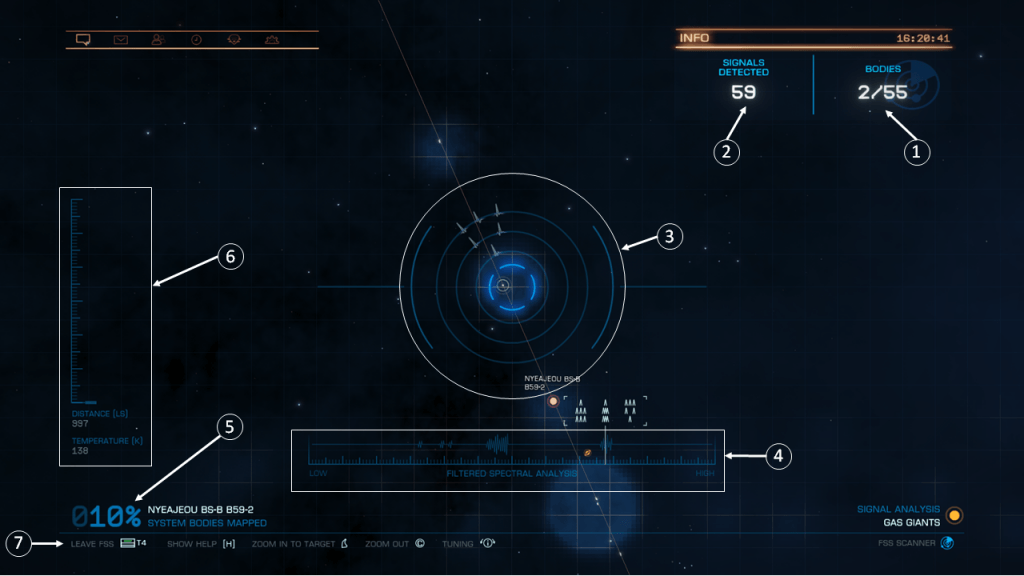
- At the top right, a counter indicates: number of discovered bodies/total number of bodies in the system. Note that all the stars in the system are automatically discovered.
- A little to the left is the number of signals detected. It is equal to the number of system bodies + number of asteroid clusters + number of Signal Sources (transient or concentrated).
- The central reticle allows to target a particular area in order to zoom in successive levels, until you can discover a body with maximum zoom.
- Filtered Spectral analysis accumulates all detected signals from the system (excluding stars). By adjusting the frequency on the spectrum it is possible to identify the type of body and to focus the analysis on a given type of body. The spectral analysis setting modifies the behavior of the central reticle according to the targeted area.
- At the lower left, the percentage of uncovered bodies is indicated (same as 1. but expressed as a percentage). So in the example presented we will reach 100% when the fraction in 1. will reach 55/55. This percentage includes all the stars, but does not take into account the asteroid clusters and the signal Sources. The system is considered to be fully discovered (credit bonus) when this percentage reaches 100%.
- On the left an area indicates the distance (in seconds light) and the temperature (in kelvins) of the body located in the center of the reticle.
- The bottom line summarize available commands.
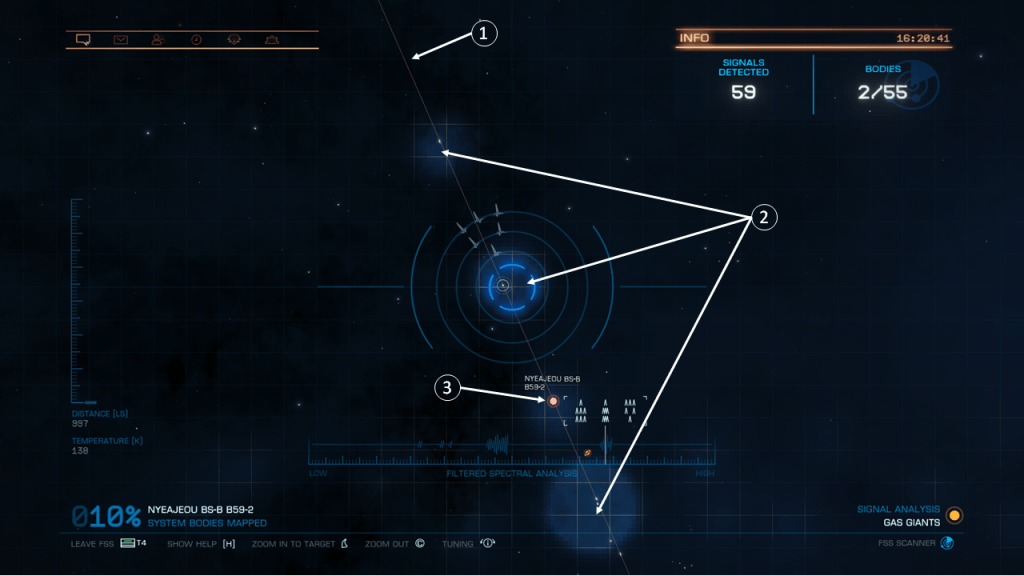
In the background the interface presents an enriched view of the system, adding to the galactic background the following elements:
- A yellow line representing the orbital plane of the system, near which the majority of the bodies are located. As the discoveries are discovered, other lines are added (yellow and white), for the orbits of each discovered body.
- More or less wide and intense blue spots appear by vertical scanning. Each contains one or more analysable signals (bodies, asteroid clusters, Signal Sources).
- The discovered bodies are represented by symbols (color code) at their current position, with their name.
N.B. : The bodies very close to the ship (a few tens of seconds lights) are automatically discovered. In this case an information is displayed in the center of the HUD:

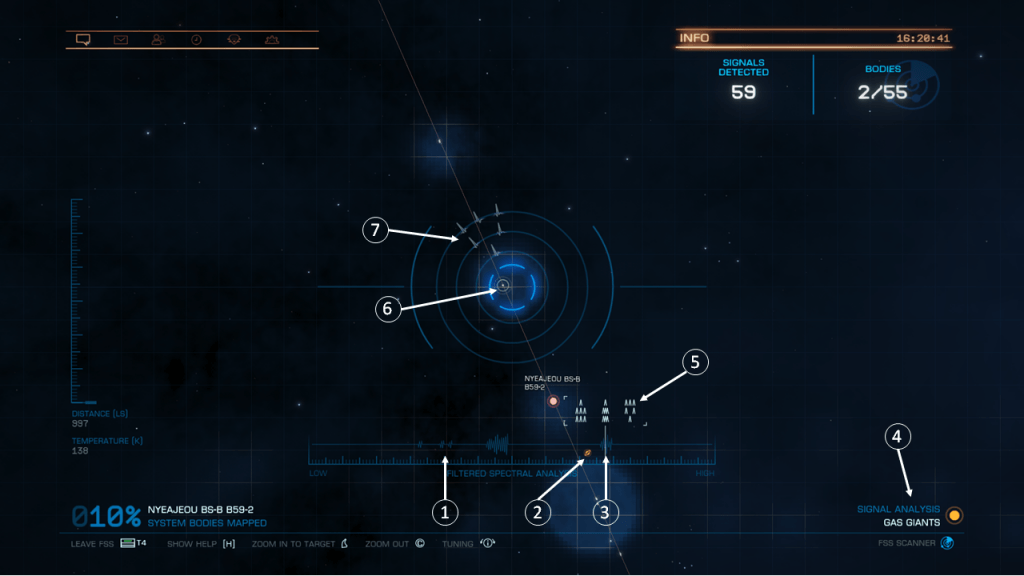
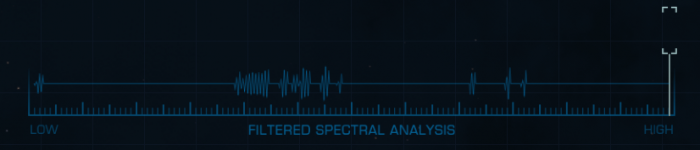
The Spectral Analysis system is composed of the frequency scale and the reticle.
- The energy signature of the system contains more or less mixed signals, represented by oscillations placed at different levels of the frequency scale.
- When a body is discovered, its signal is removed from the spectrum and replaced by a symbol (color code) depending on its type.
- The white vertical line represents the current scan frequency. It can be moved using the increase/decrease tuning commands (or axis) from the minimum frequency on the left, to the maximum frequency on the right.
- The current scan frequency determines the type of body that can be searched. This type is indicated in all letters and by a color code at the bottom right.
- This type of body is also coded more precisely using a symbol (1 to three chevrons on 3 lines: There are three symbols on the example shown).
- The reticle reacts according to its position and the adjustment of the frequency:
- If the middle circle of the reticle contains a body corresponding precisely to the current frequency, a small white circle in full line appears.
- If the body targeted by the reticle corresponds to a very close frequency, but not strictly the same, the small circle is dotted. In both cases, the middle circle of the reticle goes into blue and emits a characteristic sound.
- If the body corresponds to a more distant frequency, there is no circle at all.
- When the reticle passes near a body (which is outside its central circle) AND the selected frequency is “close enough” (about 1/4 of the axis) to that of that body, the symbol (cf. 5.) corresponding to this body appear in white on the 3 concentric circles of the reticle (outer circle of the reticle = top line of the symbol). If they are well aligned the body is close, if disturbed and staggered the body is farther.
Frequency-target matching:
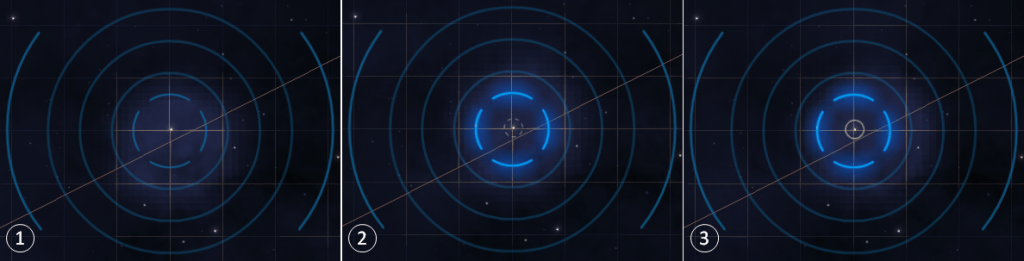
- No circle: poorly tuned frequency
- Dotted circle (+ center circle of the reticle in blue): frequency close to the good one (more or less one small graduation)
- Circle in full line (+ center circle of the reticle in blue): frequency perfectly tuned
Use of reticle and frequency scale
There are two different ways to discover a body.
Selective discovery: the first solution is to search for bodies of a given type. In this case the desired frequency is first adjusted and the corresponding bodies are searched for. For this it is necessary to:
- First set the frequency on the type of body we are interested in. For this reason we rely on the indications on the type on the lower right, the symbols and even the graduations.
- We will then move along the orbital plane of the system (possibly elsewhere if necessary) using the reticle, passing it over the blue spots. Several indications can be used to locate the right body type:
- The symbols diplayed on the reticle: if they correspond to those of the frequency bar, it is that the good body is close, and in the direction of the symbols.
- Small white circles accurately indicate the position of the bodies. If they are full line the body corresponds precisely to the frequency. If they are dotted, the body almost matches, so either adjust the frequency slightly (to move to a circle in full line) or move to the next spot. The center circle of the reticle passes in bright blue if one of these small circles is included.
- Characteristic sounds of the different types of bodies are also audible if the body is located in the center circle of the reticle or nearby.
- Once a small circle centered it is necessary to zoom in (Zoom In To Target command). And there:
- Either it zooms directly on a picture of the body, in this case it is discovered.
- Either it simply zooms by one level, and in this case you have to restart the operations 2. and 3. from this level, until you reach the level that allows you to discover the body.
- Once the body has been discovered a discovery screen appears and wins in resolution after a few seconds. At this moment the body is discovered, is named and now appears:
- In the Discovery Scanner interface in the form of a symbol.
- Under the frequency axis, in the form of the same symbol.
- In the system map (with all its information).
- In the Navigation tab of the HUD.
- Once the data is sold, in the System Map for all commanders.
- It is possible to zoom out of the discovery screen or any other level using the Zoom Out command.
Exhaustive system discovery: the second solution is to scan all the system’s bodies sequentially. In this case the blue spots are examined in the order they appear when Moving the reticule, then the frequency is adjusted to correspond to the targeted body. For this it is necessary to:
- Sequentially visit the visible blue spots in the order of appearance by moving the reticle, following the orbital plane first, then possibly the orbits as the discoveries progress, and finally in the more remote areas if there are still bodies to discover.
- When the center circle of the reticle is on a blue spot:
- Either we have the right frequency: small white circle in full line.
- Either we have a small dotted circle, and in this case we have a slight frequency tuning to do.
- Either we have no circle, in this case we quickly traverse the frequency scale until we get a circle full line (and a characteristic sound).
- Once a full circle is obtained in the center of the reticle, we Zoom In To Target. At this point:
- Either it zooms directly on a picture of the body, in this case it is discovered.
- Either it simply zoom by one level, and in this case you have to restart the operations 1. and 2. from this level, until you reach the zoom level allowing you to discover the body.
- Once the body has been discovered a discovery screen appears as before.
In this approach, it is more efficient to discover all the nearby body one by one (by level of zoom), even if it is often needed to adjust the frequency. The symbols carried on the circles of the reticle allow to quickly spot a nearby body, because they give its direction.
Discovery Screen
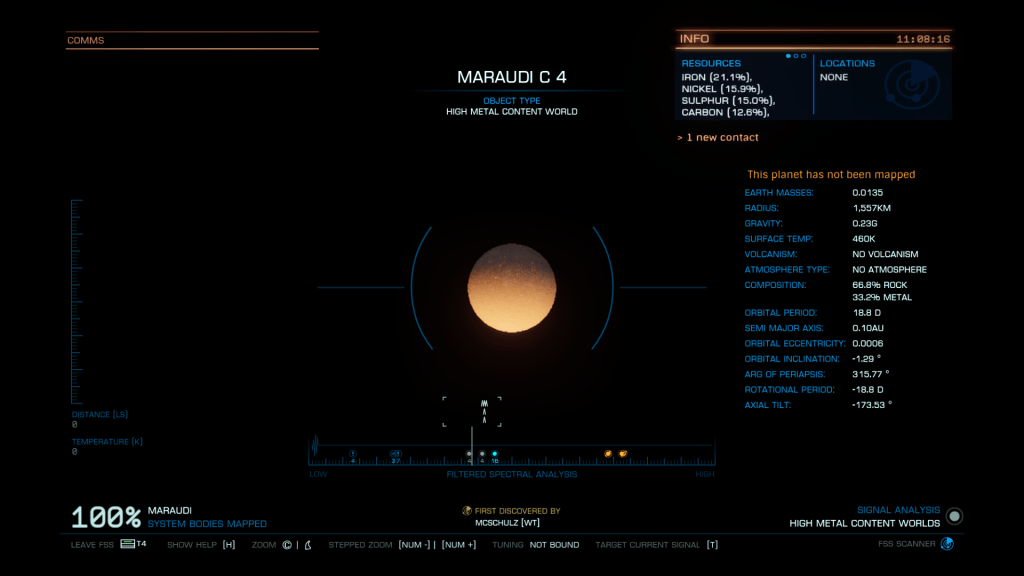
At the top right, the Location area lists the POI that exist on the planetary surface of geological, biological or civilization type. To have this information it is necessary to wait a few seconds for the analysis to be completed.
Their precise surface location can be found by using the Detailed Surface Scanner.
Below, a precise indication (in orange) whether the planet has been mapped or not.
When you are on the Discovery screen, the Target Current Signal command allows to select the active body, as if you were doing it from the System Map, or from the Navigation tab.
To deepen the use of the frequency scale:
The Detailed Surface Scanner (DSS)
Once a body is discovered, thanks to the Discovery Scanner, it is possible to map it using the Detailed Surface Scanner. For this it is necessary:
- To get close enough to the body by traveling in super-cruise. The body must be clearly visible on the screen (at least 1/8 of the screen height).
- To be in super-cruise.
- To have the Detailed Surface Scanner equipped in the active fire group.
- To not go too fast (no more than the Blue zone). That said, usually being at a rest (in super-cruise) is preferable.
- Then switch to the Third-Person view of the Detailed Surface Scanner, by using once the associated fire button .
- Launch probes (primary or secondary fire button) until you have mapped 100% of the surface.
N.b. : It is not possible to map the surface of the stars (neither the asteroid clusters nor the signal Sources).
Third-Person view of the Detailed Surface Scanner
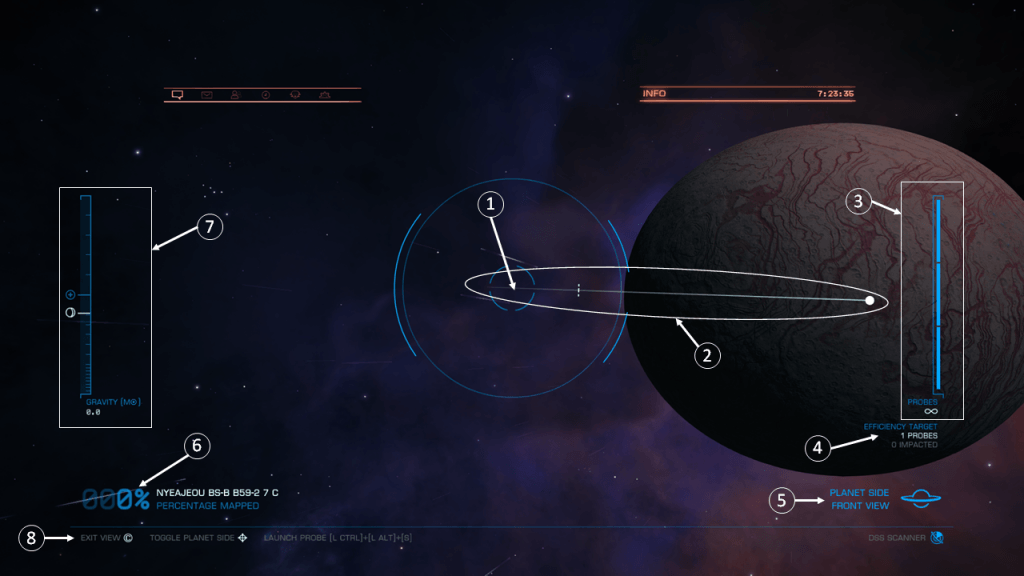
- The central reticle materializes launching direction for mapping probes. By shooting with the Detailed Surface Scanner fire button, a probe is launched in this direction.
- A trajectory indicator is used to estimate where the launched probe will land on the planetary surface, either on the visible face or on the hidden face.
- The mag shows the number of probes ready to be launched. The ammunition is unlimited (as indicated by the symbol at the bottom), but the mag can store 3 probes, which means that three probes can be launched in a row quickly. Then you have to wait a few seconds for the mag to refill.
- Below, the efficiency target (in number of probes) is indicated. If we use a lower or equal number of probes, we will have a bonus of credits (X5 instead of X4). In general it is possible to make one (sometimes two) probes better than the efficiency target. The purpose of efficiency target is also to give an idea of the number of probes needed and thus to choose its strategy of prospecting. Below the number of probes already used (having impacted the planet) is indicated in white if we are still below the target, in red if it is exceeded.
- An icon and a text specify which face of the planet is currently represented: Front (visible) or Back (hidden). Using the Toggle Front/Back View command, it is possible to change sides to see the area mapped by the probes already launched for each of the two faces.
- In the lower left corner, the percentage of mapped area is indicated. The planet becomes mapped, as soon as we reach 90% (data between 90 and 100% are completed automatically).
- On the left an axis indicates the intensity of the gravity of the planet, allowing to appreciate the trajectory curvature of the probes.
- At the bottom, the available commands are summarized. In particular the Exit View command allows to exit the Third-Person view of the Detailed Surface Scanner.
Visualization of mapped areas by probes
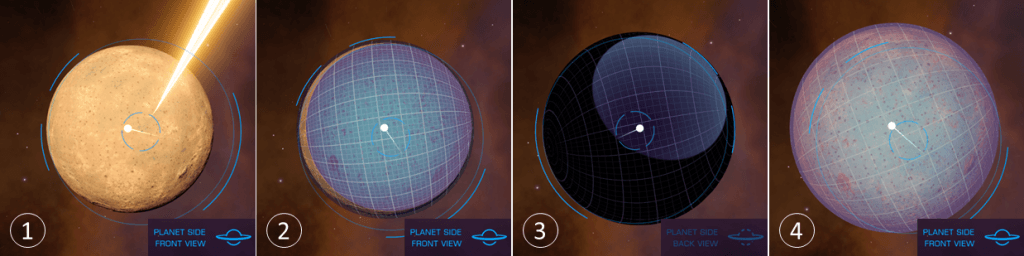
- No probe has impacted the planet. A probe has just been launched, you can see its trail in yellow.
- A probe has impacted the planet on its front side. The surface in light blue is mapped.
- A second probe has impacted the planet on its back side (rear view activated). The surface in light blue is mapped.
- The planet is fully mapped. It is surrounded by a light blue sphere.
Probe Trajectory indicator
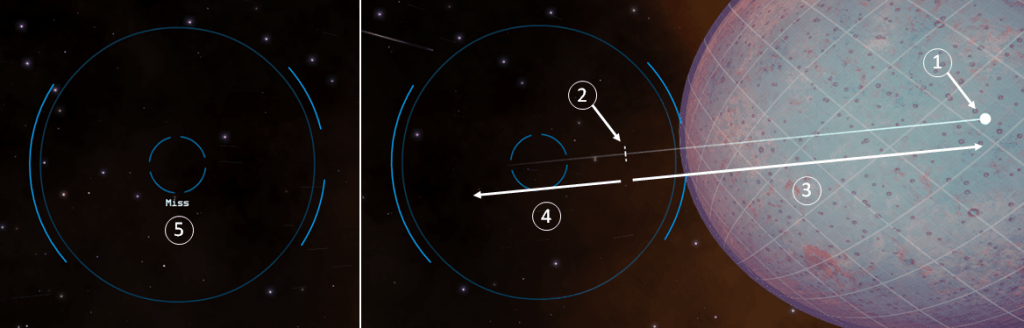
The line represents the direction for the trajectory of the probe.
The position on the line indicates the curvature of this trajectory:
- Direction of the center of the planet.
- Direction of the planet’s horizon. A probe launched in this direction will impact the planet at the boundary between the front and the back sides, one half of the circle mapped on each side.
- Range of trajectories for which the probe impacts the front (visible) side.
- Range of trajectories for which the probe impacts the rear (hidden) side.
- If the “Miss” indicator appears, then the probe will miss the planet and be lost in space. Note that the probes lost in space have no negative impact for efficiency target.
The System Map
All discovered bodies (by us or another commander) appear in the system map. If at least one body has not been discovered, the map is incomplete.

It is thus possible:
- To select bodies.
- To have information on their detailed characteristics (second tab):
- The name of the body
- First discovery and first mapping tags
- A general description of the type of body
- An indication (red rectangle) specifies whether the body has been mapped or not
- Physical data (radius, gravity,…)
- The list of materials available on the surface
- The number of Points Of Interest (red rectangle) on the surface, in different categories: geological, biological, human, Thargoid, Guardian.
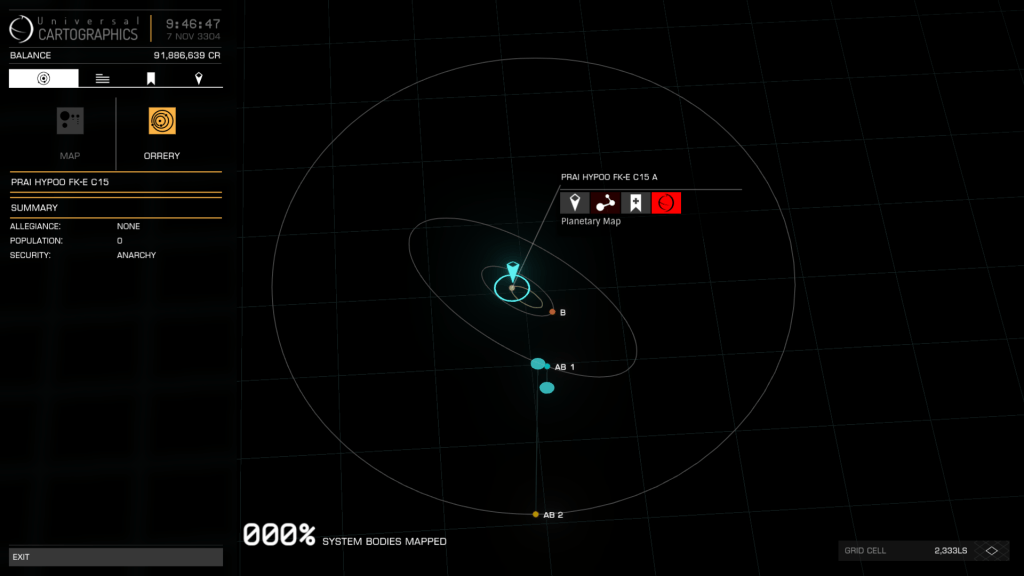
- To visualize the orbits of the bodies in 3d view: Orrery Map (Image below).
- To put bodies in bookmarks
The Navigation Tab
All discovered bodies appear in the Navigation Tab of the HUD. They are thus selectable.
If they were discovered by another commander, they appear under the heading unexplored.
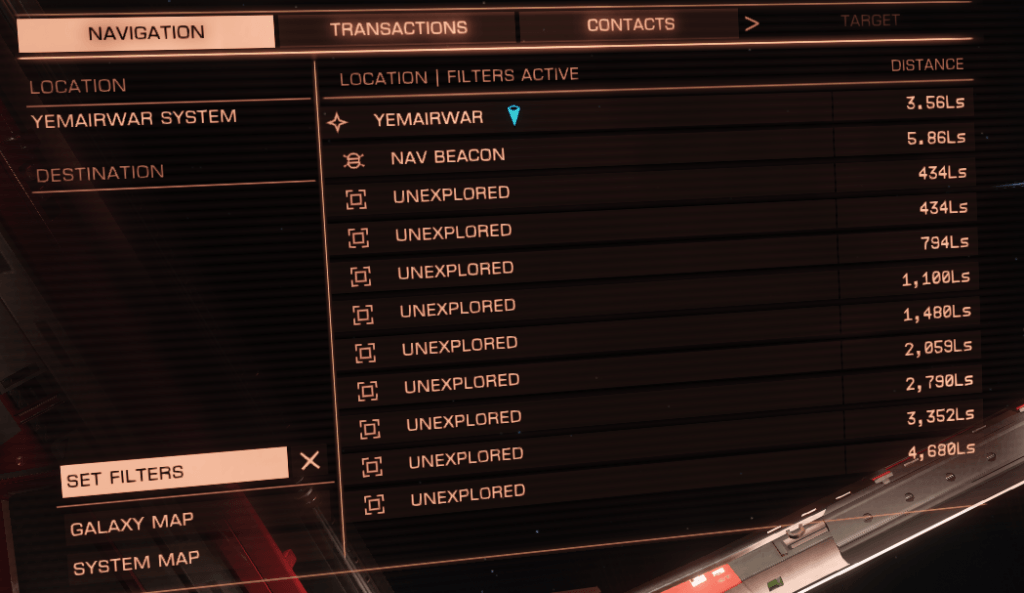
In this case it is possible to discover them using the Discovery Scanner again in order to earn the corresponding credits when selling the data to Universal Cartographics.
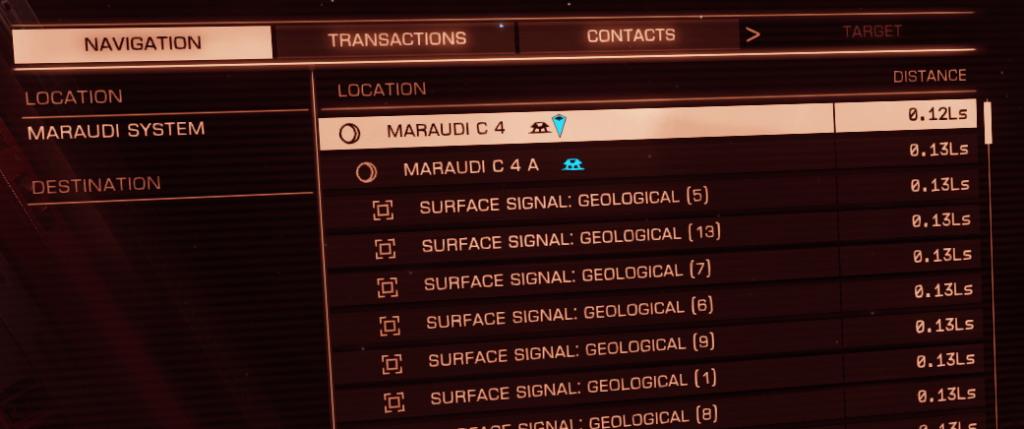
If a planet without atmosphere has been mapped, and this planet has points of interest (geological, biological, or civilization) on its surface, then the Points Of Interest are listed in the Navigation tab, and can be selected to go visit them on the surface.
The Points Of Interest are also numbered to facilitate tracking.
Integration of exploration discoveries into the Codex
The Codex, in its discoveries section, propose several categories of discoveries. The exploration mechanisms seen here allow elements to be incorporated into the Codex with the confirmed status (or reported status for other commanders). That said the method varies depending on the type of element:
- Stellar bodies are automatically integrated when they are discovered. So during the initial scan (“Honk”) for stars. When discovering with Discovery Scanner for planets and space POIs. Moreover, on the discovery screen of a body (maximum zoom level), the Open Discovery Command (Change Mode bindings menu) opens the Codex page corresponding to the type of body currently observed.
- On the other hand, for elements of biology and geology, as well as civilizations, to integrate a new type of object, it is necessary to scan it with a short-range Composition Scanner (and therefore to visit the Point Of Interest before that). This module is equipped on all ships and SRVs, and is available through fire groups. It can be used in Analysis mode, leaving the fire button pressed for some seconds. Examples of elements: a geyser, a fumerole, a Thargoid probe, a guardian pylon,…
Refer to the Codex dedicated page for more details.