
This page aims to take a look at the various dangers that an explorer can encounter, with for each:
- Under what circumstances?
- What dangerousness: real or exaggerated?
- How do you prevent this?
- How do you get out of it when it happens?
Fuel failure
Circumstances
- When one arrives, with an almost empty tank in a system whose main star is not “scoopable” (Fuel Scoop)
- If you forget the Fuel Scoop module (beginning of an expedition…)
Dangerousness
- The fuel failure is one of the greatest dangers for the Explorer in Elite: Dangerous, because a complete failure causes the destruction of the ship
Prevention
- First of all, equip a Fuel Scoop of sufficient size. Ideally, the amount of fuel scooped per second must be greater than or equal to 1/15 ° of the amount of fuel consumed by the FSD (the assumption of a reload at each jump with a duration of 15 s). The statistics for fuel collectors and FSD are available in the equipment section or on the Coriolis and EDShipyard websites. Below is an indicative table of the minimum size of Fuel Scoop to equip according to the FSD used, with reload hypotheses in 15s or 10s.
| FSD | Max. Fuel per jump | Fuel Scoop mini (15s) | Fuel Scoop comfortable (10s) |
|---|---|---|---|
| 2A | 0,9 T | 2B | 3D and more |
| 3A | 1,8 T | 3C | 4D and more |
| 4A | 3 T | 4C | 4A and more |
| 5A | 5 T | 4A | 5A and more |
| 6A | 8 T | 5A | 6A and more |
| 7A | 12,8 T | 6A | 8B and more |
- Equip a fuel tank of sufficient size. Ideally 6 jumps minimum of autonomy, it is not advisable to go below 3.
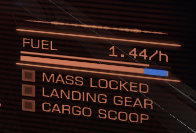
- Before each jump, check
- The filling level of the tank (the blue part corresponds to what will be consumed by next jump)
- The type of the arrival star (shown in the Information Bar)
- If the remaining fuel after jump is less than the size of the blue part and the next star is not scoopable, stop the jump and consider adapting the route.
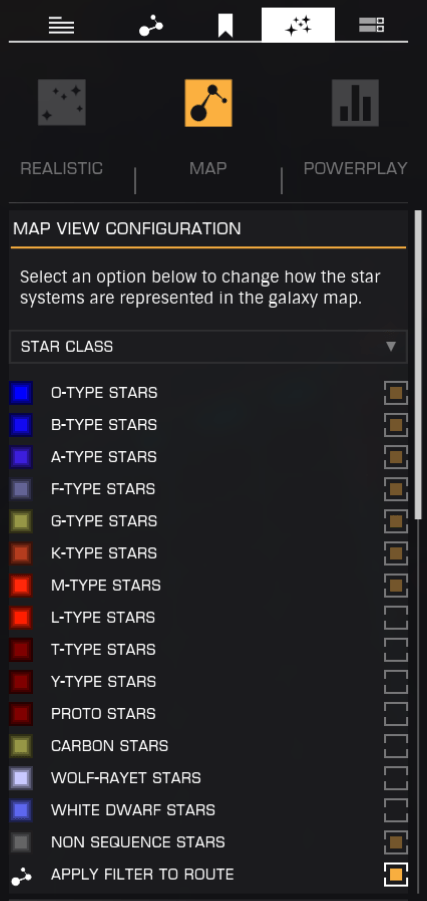
- For maximum safety, use the “Star Class” filter in the Galactic map, keeping only the scoopable stars: O, B, A, F, G, K, M (+ possibly non-scoopable but rare stars, such as neutrons). The important thing is to disable the classes L, T and Y, very frequent but not scoopable. Do not forget to apply the filters when plotting the route. This allows you to travel only in systems where you can recover fuel on the main star.
To get by, if you find yourself in a system whose main star is not scoopable, with not enough fuel to jump to the next system of the route:
- Before all disable all unnecessary modules, to reduce consumption (do not disable the life support module)
- If there is still a little fuel in the main tank
- Check if a closer, scoopable system is reachable
- Check if there is not a scoopable star reachable (without running out of fuel during the travel in Supercruise) in the system itself
- Eventually, it is possible to do a FSD injection (or a Neutron supercharge), which reduces fuel consumption very strongly for a given jump distance
- If you are really dry, or that previous options have failed
- Note the system where you are
- Disconnect from the game
- Use the services of Fuel Rats, groups of CMDR doing refueling for free
Emergency Drop
Circumstances
- Emergency stops occur when the supercruise is interrupted abruptly, at a speed greater than 30 km/s, either by the CMDR by mistake or by the onboard computer to avoid a catastrophic situation.
- The possible causes are:
- Drop triggered by the CMDR (the computer asks for confirmation, so you have to ask the drop twice in a row quickly for this to happen)
- Entering the exclusion zone of a planet (planet where it is not possible to land)
- Entering the exclusion zone of a star
- Excessive speed when arriving in a planet’s low orbit
- Deactivation by the CMDR of the FSD or of the Thruster module (for example, during a repair attempt in supercruise). Warning, the shutdown of Thrusters in Supercruise (which are not used in this mode) causes an emergency drop, probably because the FSD must depend on it for its operation.
- In the event of an emergency drop, the vessel will drop in normal space, and it will take some time for the FSD to work again (cooldown of 30 s).
Dangerousness
- Contrary to what one might think, the emergency drop is actually not very dangerous.
- This causes the loss of one or a few percent of damage on some modules and/or the hull. Except when flying in a heavily damaged ship, there is no risk of destruction. It is the accumulation of many emergency drops that can become problematic in exploration (especially the damage to the power plant, not repairable).
- The level of damage increases as a function of the speed in supercruise when dropping. Very high speeds (e.g. 800 c) can lead to high damage (5-10% on many modules and hull). But these speeds are reached only away from the stars, so it is necessary to be triggered by the CMDR for this to happen (for example in case of repair of the FSD or engines, drop provoked).
Prevention
- To avoid provoked drops, the best practice is to never attempt to repair in supercruise (always switch to normal space first).
- Never press the Supercruise exit button twice in a row, without a very good reason (a priori there is none…).
- For exclusion zones, enable the display of orbits, and never navigate in circles of exclusion zones (yellow).
- To avoid the exclusion zones of the main star, when entering the system:
- Either set the engines to zero after the hyperspace jump is activated (the ship will slow down to the minimum speed when arriving). This solution is to be preferred during the time to familiarize yourself with a new ship and its maneuverability in supercruise.
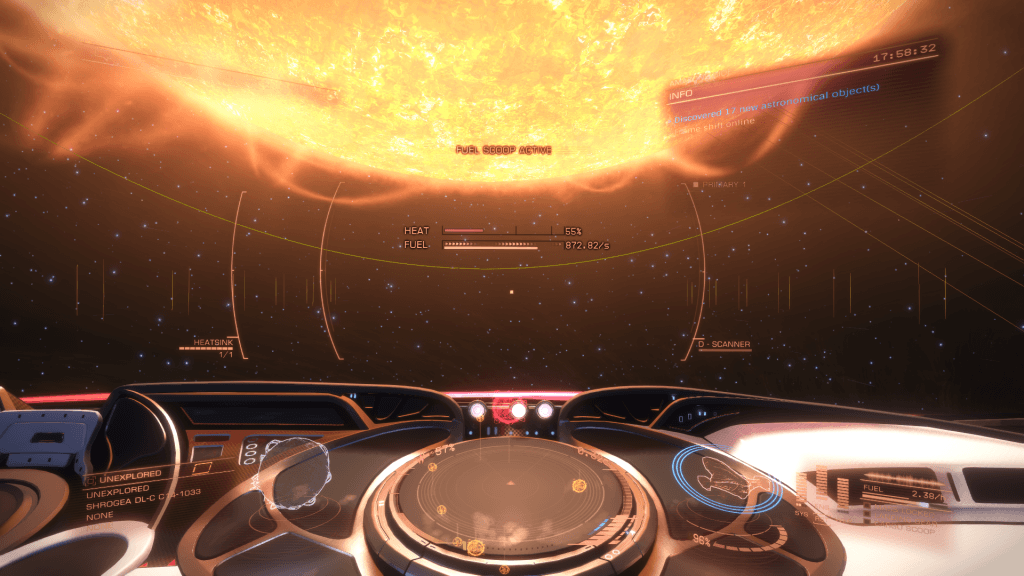
- As soon as the system arrives, orient the ship quickly out of the exclusion zone (ideally tangentially to optimize fuel scooping).
- Always have a heat sink launcher module installed (avoid overheating, see part to get out).
- When outfitting the ship take into account the thermal management, to avoid ship that heat too much. In particular, it is strongly recommended to equip a Class A power plant (most efficient thermally).
To get By
- First of all don’t panic. In general there is no emergency, unless the emergency drop occurred in the cone of a neutron star or a white dwarf. Refer to the Neutron stars and white dwarfs guide for more details.
- In the event is caused by the CMDR, it is sufficient to wait until the end of the FSD cooldown to be able to go back in supercruise. Possibly repair the modules damage with an AFMU.
- In the event of a drop on an exclusion zone, it is necessary to:
- Orient the ship in the opposite direction to the star
- Wait for the end of the FSD cooldown
- Launch the jump for Supercruise, aiming for the escape vector
- In the meantime, the ship may start to heat up. In this case when the temperature reaches 100%, launch a heat sink. If not possible, disable unnecessary modules (shield, Fighter Bay, SRV Bay), but not the thrusters or the FSD. A light heat level (less than 150%) will just do a few light damage to the modules. Beyond the damage increases rapidly.
Other cases of overheating
- Tips on thermal heatsink (s) equipment, and thermal management (class A power plant) are also useful to avoid other situations that can generate the ship’s overheating and thus cause damage
- These situations are:
- Fuel scooping time near the stars, which generates heat. In this case it is necessary to manage the distance to the star, in order to stay in an area where the heat increase is manageable. The ideal is not to exceed the distance where the Fuel Scoop achieves precisely its maximum efficiency.
- Sometimes in the event of a surface manœuvre, if gravity is high (the main and lateral motors are strongly stressed).
Neutron Stars and white dwarfs
Circumstances
- As with all Stars, it is possible to make an emergency drop on the exclusion zone. This happens more easily because with neutron stars and white dwarfs, we get out of hyperspace very close to the exclusion zone.
- On the other hand, neutron stars and white dwarfs present an additional risk when the emergency drop occurs inside the star cone.
Dangerousness
- A conventional emergency drop (off-cone exclusion zone) is no more dangerous than for the other stars.
- On the other hand an emergency drop in the cone of a neutron star or a white dwarf is extremely dangerous, because:
- The ship takes damage very quickly
- It’s hard to get out
Prevention and escape
- Refer to the dedicated tutorial: Traveling with neutron stars and white dwarfs
Planetary surface Crash
Circumstances
- During a surface flight it is quite easy to hit the surface by mistake.
- This can be just by landing a little abruptly.
- Or with too fast approach, especially when one underestimates the impact of high gravity.
- An error boost towards the ground can also be fatal.
Dangerousness
- These accidents may be minor or on the contrary dramatic, going as far as the destruction of the ship.
Prevention
- The essential point is to always check the gravity before leaving the orbit in order to know what to expect.
- It is also prudent to set the thrusters to 0 during the glide phase (the speed is fixed in glide regardless of the power assigned to the thrusters). This allows you to leave glide at the stop before starting your approach.
- From 1 G you have to be very careful. From 2 G you have to really approach smoothly.
- In case of high gravity (greater than the theoretical capabilities of the ship’s thrusters), any ship is capable of landing and relaunching. Indeed, the rear thrusters, and the bottom thruster (vertical pushing upward) have a thrust capacity that is always a little higher than the gravity, whatever it is. However:
- This is not true for other thrusters in high gravity, so you have to keep your ship well horizontal or vertical upward.
- The thrust is only a little higher than the gravity. So you have to proceed slowly, and keep calm.
- Often the exploration ships have undersized shields, making the risk particularly important. Travelling without a shield does not pose a problem in space, but is quickly problematic in the case of surface exploration. It is therefore advisable:
- To always take a shield: even weak it will absorb the slightly brutal landings and avoid the cumulative loss of a few percent of Hull at each landing.
- If you are going to do a lot of surface exploration, it is recommended to take a larger shield. As an indication, a shield whose optimum mass is greater than the hull mass of the ship will be quite tolerant to a rather violent impact. This criterion makes it possible to optimise the safety/Jump range ratio (shield mass).
- Unless you really want to maximize the jump range, put a thruster not too bad, allows to make surface explorations more fun and more secure. A Class A thruster, of a size smaller than the maximum possible size, generally has an almost optimal engine for a weight significantly lower than the best possible engine for a given ship. Sometimes class D and maximum size is also a good choice. It is a choice to make between flight optimization on the surface and optimization of the jump range.
To get By
- In case of imminent shock, just before contact, put 4 pip in the systems, to reinforce the shield.
- Before it is better to have 2 PIP systems and 4 PIP engines, in order to maximize its thrust.
- In case of a rapid fall, you can try a boost up once (or several times) to maximize the slowdown of the fall.
Asteroids
The same difficulties can arise with flights within asteroid belts, however the absence of gravity limits the risks.
Getting stuck in a system
Circumstances
- In some cases you may not be able to come back from a system when you have jumped:
- Supercharged by a neutron star or a white dwarf
- Made using a FSD injection
- Made manually with a partially empty tank, and that one scooping fuel upon arriving
Dangerousness
- This case occurs more often than we imagine, especially with the use of neutron stars
- In some cases, only self-destruct is possible to leave the system.
Prevention
- Always think about the return path when you boost the jump range (neutrons, white dwarfs or FSD injection), especially when traveling in areas with low-density stars (out of the galactic arms, very above or below the Galactic plane).
- Always keep a number of FSD injections equivalent to those made to go for the return.
To get By
- Before launching self-destruct, it is necessary to ensure that the situation is completely hopeless:
- Think about disabling all the filters in the galactic map to benefit from all the available stars (even non scoopable).
- The plotter on the onboard computer makes route fairly straight, it is sometimes possible to return by bypassing other systems, sometimes in the opposite direction
- Check if it is not possible to do a FSD injection to return
- Check that there is not a neutron star or an accessible white dwarf that would allow you to return
- In some cases, by emptying its fuel tank in an optimized way we can gain the little range that we lack. Just stay in supercruise until you reach the desired level. Be careful, however, not to run out of fuel before or after jumping (arriving in a system where there is no scoopable star).
N.b. : Out of game mechanics. In some cases Frontier Development may agree to replace you in your previous system by making a well argued and polite ticket (exploration data representing a large sum, arriving in the system “by mistake”, long distance travelled). But no guarantee. To do this, disconnect from the game, make the ticket and wait for the answer.
NPCs attacks
Circumstances
- In some systems, containing tourist beacons or stations, it is possible to encounter pirates (NPCs) that can intercept or attack you.
Dangerousness
- Since exploration ships are generally poorly protected and poorly armed, this may be a significant risk.
Prevention
- Stay cautious as soon as a system is inhabited.
- The best thing is to have nothing in the cargo bay (except drones). In fact, normally pirates do not attack ships without cargo. Unless the player is wanted, where there may be exceptions.
- One possibility is to protect your ship (shield or hull, in order to better defend when attacked), or even to bring weapons it to defend itself. But this will greatly reduce the jump range.
To get By
- Dropping the contents of the cargo immediately avoid the attack in general.
- To avoid destruction, the best is to jump to another system (no mass lock in this case):
- In the left navigation panel, select a random system (usually the nearest one)
- Trigger the jump as soon as possible
- Boost (in Zig Zag, FA-OFF ideally) to the destination system
- If one is not sure to win a mini game during interception, submitting (engines to 0) reduces the cooldown duration of the FSD and therefore allow to flee faster.